Testing for soil properties is important to determine the best land use and ensure optimal plant growth. Farmers, gardeners, and other agricultural professionals can benefit from ensuring their soil is optimal. While that may sound daunting, it’s easier than you might think! Without further ado, let’s go over the best way to test your soil properties at home.
What are Soil Properties?
Soil properties refer to the physical and chemical characteristics of soil. These properties include texture, structure, pH, organic matter content, nutrient content, and water-holding capacity. Understanding these properties is important for determining soil suitability for various uses. More common examples of this are crop production and building construction.
How to Test Soil Properties
You can test soil properties through various methods, such as laboratory analysis and field testing. The most common field testing methods are soil texture by feel, soil pH testing, and soil organic matter testing.
Soil Texture
The first step to testing soil properties is to feel your soil’s texture. The three main types of soil texture are sand, silt, and clay. Simply put, you’re looking at the kind or size of the mineral particles in the soil.
- Sandy soil has larger particles and is well-draining but does not hold water well.
- Clay soil has smaller particles and holds water well but can be slow-draining.
- Silt soil is a balance between the two and offers good water retention and drainage.
Testing Soil Texture by Feel
Using the following steps, soil texture can be determined by feel:
- Take a handful of soil and moisten it with water.
- Rub the soil between your fingers to remove any large particles.
- Squeeze the soil into a ball and then flatten it out.
- Observe the texture of the soil. Sandy soil will feel gritty, silt soil will feel smooth, and clay soil will feel sticky.
Soil Structure
Soil structure refers to the way soil particles clump together. The structure can be described as granular, blocky, platy, or prismatic.
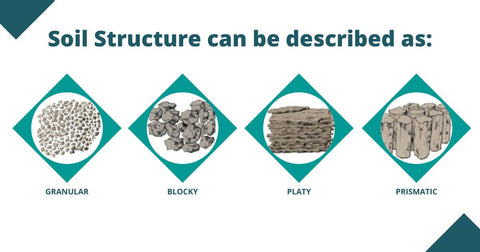
- Granular soil has small, round particles. They are loosely packed and provide good aeration and drainage.
- Blocky soil has larger, irregularly shaped clumps that can slow water drainage.
- Platy soil has thin, flat layers that can limit root growth,
- Prismatic soil has vertical columns that can improve drainage.
Soil pH Levels
Testing soil properties is incomplete without testing for the soil’s pH. This process measures the soil's acidic or alkaline, on a scale of 1 to 14. Most plants prefer soil with a pH between 6 and 7, which is slightly acidic to neutral. Soil pH affects nutrient availability and the activity of soil microorganisms. You should test soil pH to determine whether you need to amend the soil with lime or sulfur to adjust its pH to a suitable range.
Testing Soil pH Levels
Using a Digital Soil pH meter makes testing easier. But if you want to go a more fun route, a soil pH kit or test strips can do a similar job. Here’s how to accurately measure your soil’s PH using a strip or kit:
- Use a soil auger or soil corer to collect soil samples from several locations within the test area.
- Mix the soil samples together in a clean container and allow them to dry.
- Once the soil sample is dry, break up any clumps and remove any debris from it.
- Add a known volume of distilled water to the soil sample using a measuring cylinder. The soil sample size and the pH testing kit you use will determine the amount of water needed.
- Mix the soil and water thoroughly to create a soil slurry, and add a few drops of pH indicator solution to the slurry.
- Allow the soil and indicator solution mixture to stand for the required time, as specified by the instructions of the pH testing kit.
- Once the required time has passed, use a pH meter or pH testing strips to measure the pH of the soil.
- If using pH testing strips, dip the strip into the soil mixture and allow it to sit for the required amount of time, as specified by the instructions of the pH testing kit.sting kit.
- Compare the color of the strip with the color chart provided with the pH testing kit to determine the pH level of the soil.
- If using a pH meter, follow the instructions for calibrating and using the device to measure the pH of the soil.
- Record the pH reading of the soil sample for each location tested and compare the results to determine the average pH level of the soil in the area.
Soil Organic Matter
Soil organic matter refers to the amount of living and decomposing plant and animal material in the soil. This is because organic matter provides nutrients to plants, improves soil structure, and increases their water-holding capacity. Moreover, testing your soil’s organic properties can help determine the need for additional organic amendments, such as compost or manure.
Soil Organic Matter Testing
- Use a soil probe or a shovel to collect soil samples from several locations in the area you wish to test.
- Mix the samples together using a clean plastic container; ideally using a beaker for better observation. Then, allow them to air-dry for a few days.
- Weigh a small amount of the soil using a digital weighing scale and place it in a porcelain crucible.
- Place the crucible with the soil sample in a muffle furnace at 440°C for 24 hours using lab tongs.
- After heating the soil, weigh it using the same digital scale and record the final weight.
- Calculate the percentage of organic matter using the following formula:
Organic matter (%) = (Initial weight - Final weight) ÷ Initial weight x 100
- Dispose of the soil sample using a waste bin and clean the porcelain crucible using a scrub brush and soap.
Soil Nutrient Content
Another factor to consider when testing soil properties is its nutrient content. This refers to the amount of essential nutrients in the soil, such as nitrogen, phosphorus, and potassium. Moreover, testing for soil nutrient content can help determine the type and amount of fertilizer needed to optimise plant growth.
To know the nutrients needed for your solid, it’s best to visit accredited laboratories. However, if you don’t need a deep dive into your soil’s nutrient content, check out our complete Soil Test Kit or from your local gardening stores.
Soil Water-Holding Capacity
Soil water-holding capacity refers to the ability of the soil to retain water for plant use. For example, sandy soils have low water-holding capacity, while clay soils have high water-holding capacity. So, testing soil water-holding capacity is important to determine irrigation needs and prevent over or under-watering.
Conclusion
Testing soil properties is important to determine the suitability of soil for various uses and to optimise plant growth. Soil texture, structure, pH, organic matter content, nutrient content, and water-holding capacity are all important soil properties to consider. Field testing methods, such as soil texture by feel, soil pH testing, and soil organic matter testing, can provide quick and easy results. For more accurate and detailed analysis, laboratory testing may be necessary.


