Picture this out. You're conducting a backyard experiment to grow the biggest, juiciest tomatoes possible. You've carefully chosen the seeds and prepped the soil, and now it's time to add that special nutrient solution you mixed up. But, how much solution do your seedlings need? Too little, and they might struggle to thrive. Too much, and they could get burned.
Just like precise measurements are critical to a successful backyard experiment, scientists need the same level of accuracy for those tiny amounts of liquid they work with. The unassuming graduated cylinder is your secret weapon for ensuring every drop is measured precisely.
This guide will take you from a backyard experimenter to a cylinder master. We'll uncover what it is, why it's so important, and most importantly, how to use it confidently, just like the seasoned scientist you aim to be.
Graduated Cylinder Defined
Forget clunky beakers and confusing flasks this time. The graduated cylinder brings a touch of sleekness to the party. This lab tool is like a high-tech test tube without the cape. Etched with markings along its side, the graduated cylinder relies on a hidden code. It transforms into a ruler for liquids, only way cooler and way more precise.
Unlike a ruler though, graduated cylinders come in all shapes and sizes, from holding just a few precious drops to enough liquid to fill a small fish tank. This versatility makes it a true hero in the science world. Whether you're studying microscopic organisms or analysing chemical reactions, this essential tool ensures your experiment gets the perfect dose every single time.
Understanding the Markings
So, the graduated cylinder boasts a sleek design and markings etched along its side. But what do they actually mean?
These markings, much like the increments on a ruler, represent volume. Each mark corresponds to a specific amount of liquid the cylinder can hold. Think of it like a roadmap for your liquid measurements.
Here's how to read these markings: The closer the lines are spaced together, the more precise your measurements can be. For those tiny drops, you'll need to focus on the finer lines. Meanwhile, for larger volumes, the wider markings will guide you.
Parts of Graduated Cylinders
Graduated cylinders aren’t your ordinary measuring tape for liquids. Let's take a closer look at its key components:
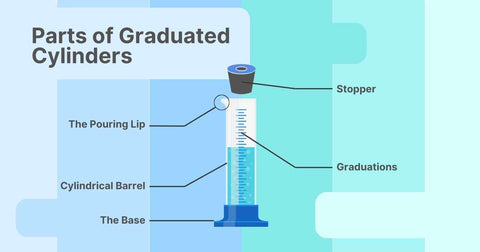
Cylindrical Barrel
This is the main cylindrical body, made of clear glass or plastic. It's where the magic happens. The markings are etched along its side, letting you see the volume of liquid you're measuring.
The Base
Just like any lab tool needs a sturdy base, the graduated cylinder has a stable and flat bottom. This keeps it upright and prevents spills, which is equally important when dealing with precious or hazardous liquids.
The Pouring Lip
Precision is key, but so is control. The graduated cylinder boasts a spout or pouring lip at the top. This allows for smooth and controlled transfer of liquids. Hence, it minimises drips and ensures you only measure what you need.
Graduations
Volumetric markings on the barrel indicate liquid volume, typically denoted in milliliters (mL) or liters (L). Graduations should be evenly spaced and easily readable for accurate measurements.
Stopper
Some graduated cylinders include a stopper that is insertable at the barrel’s top to seal it. Made of glass or rubber, stoppers prevent spills or evaporation, enhancing the cylinder’s utility.
Using The Graduated Cylinder Like A Pro
Let's break it down into simple steps:
- Size Up Your Potion. Graduated cylinders come in all shapes and sizes, just like beakers for potions. For those precious drops you need to measure with laser focus, a smaller cylinder (think 5 mL or 10 mL) will be your best friend. For larger concoctions, a bigger one (up to 1000 mL or even more) might be necessary.
- 2. Keep A Steady Hand And Use A Sharp Eye. We don't want any wobbly measurements here. Place your graduated cylinder on a flat surface and hold it with your non-dominant hand to prevent any spills. Now, get down to eye level with the markings on the cylinder. This ensures you read the volume correctly and avoids any sneaky parallax errors (think of how a straw looks bent in a glass of water).
- Befriend the Meniscus. Liquids tend to curve a bit at the top where they meet the cylinder wall. This curved surface is called the meniscus. When reading the markings, focus on the bottom of the meniscus, not the top. This will give you the most accurate measurement.
-
Pour Your Liquids Like a Pro.
Patience is key, so slowly pour your liquid down the side of the cylinder to avoid air bubbles. Additionally, ensure all the precious liquid is accounted for. Once you've reached your desired volume, stop pouring. Remember, the graduated cylinder is for measuring, not storing liquids. Treat it like a borrowed lab coat. Use it with respect and return it clean. -
Keep Your Cylinders Clean
Just like any scientific instrument, keeping your cylinder clean is crucial for accurate measurements. Rinse it thoroughly with distilled water after each use and allow it to dry completely before storing it.
Types of Graduated Cylinders
Now that you've mastered the basics, let's explore the different types of graduated cylinders available:
Based on Materials
Polymethylpentene or TPX (PMP): This clear and expensive material offers excellent heat resistance (up to 177°C) and can be autoclaved, making it ideal for tasks requiring high temperatures.
Polypropylene: This translucent plastic cylinder comes in handy for larger volumes (above 1000 mL) and often features Total Contained (TC) and Total Delivered (TD) scales for added convenience.
Borosilicate Glass: This classic material is known for its low thermal expansion, meaning it maintains its transparency and strength even with temperature changes. However, glass cylinders are more fragile than plastic ones and might not be available in larger sizes.
Based on Precision
Class A: Crafted from borosilicate glass, Class A cylinders offer the highest level of accuracy and are ideal for precise volumetric analysis.
Class B: Less precise than Class A, Class B cylinders are suitable for general lab work where extreme accuracy isn't required. They can be made from soda-lime glass or borosilicate glass, depending on the manufacturer.
Based on Style
Style I: Features a beaded lip and spout for easy pouring.
Style II: Offers a stopper on a tapered neck for additional safety during handling and pouring.
Style III: Similar to Style I with a spout but includes a reinforcing band for extra durability.
Based on Capacity
Small Cylinders (5ml - 100ml):
- Ideal for precise measurements of small volumes.
- Markings are typically very detailed, with the smallest graduation being 0.1ml or 0.2ml.
- These cylinders are often slender for better visibility and control when measuring tiny amounts.
Medium Cylinders (250ml - 500ml):
- Designed for measuring moderate volumes of liquids.
- Markings may be slightly less detailed than smaller cylinders, with the smallest graduation being around 0.5ml or 1ml.
- They tend to have a wider base for stability when handling larger volumes.
Large Cylinders (1000ml - 4000ml):
- Made for measuring large quantities of liquids.
- Markings are generally more spaced out, with the smallest graduation being around 5ml or 10ml due to the larger volume they encompass.
- These cylinders are often wider and taller to accommodate significant amounts of liquid, and may have a pour spout for easier transfer.
Considerations In Choosing Your Graduated Cylinder
Just like choosing the right tool for the job, selecting the perfect graduated cylinder needs careful consideration. Here's a breakdown of the key ingredients for success:
- Consider The Size. This is no no-brainer, but the cylinder's capacity should comfortably accommodate the volume you need to measure. Like using a teaspoon to measure a cup of sugar, using a cylinder makes measuring efficient.
- Calibration: For utmost accuracy, ensure your cylinder is properly calibrated. Class A cylinders, made from borosilicate glass, offer the highest level of precision, while Class B cylinders are suitable for general lab work where extreme accuracy isn't crucial.
- Material: Glass cylinders are your champions of heat resistance, making them ideal for high-temperature applications. However, plastic cylinders are the clear winners when it comes to breaking resistance – a big plus for clumsy hands or situations where safety is paramount!
- Readability: Clear and distinct graduation markings are essential for precise measurements. A blurry or unclear cylinder is like a recipe missing key ingredients – it won't yield the desired results!
- Special Features: Think about your specific experiment. Does it involve frequent liquid mixing? A cylinder with a spout can make pouring a breeze.
Put Your Graduated Cylinder Knowledge into Action
Not everyone knows this, but choosing the perfect graduated cylinder is no sweat. Remember, consider the size you need, the desired level of accuracy, material properties, readability of markings, and any special features like spouts. With these factors in mind, you'll be a grad cylinder pro in no time.
Need a reliable source for lab equipment? Many scientists trust Science Equip for their graduated cylinders, beakers, burners, and more. Also, our helpful guides and our commitment to quality ensure you have the tools you need for successful and safe experimentation. After all, the right tools are essential for both precise results and lab safety.
Let's make your lab a haven for scientific discovery. By choosing the right equipment and prioritising safety, you can create an efficient and successful workspace.


